Sandbox
Sandbox
Our API Sandbox contains a full simulation of our APIs but without connecting to any real customer accounts. Any developer can access this Sandbox using their own self signed certificates.
Try our API in the Sandbox
We provide a regulatory sandbox that fully reflects our production APIs.
Regulatory Sandbox
- Authorisation Server 1: Provides both strict and permissive client profiles in headless and non headless options.
- OIDC Well Known endpoint:
https://auth1.openbanking-sandbox.zopa.com/.well-known/openid-configuration - baseUrl:
https://auth1.openbanking-sandbox.zopa.com/
Step by Step guide to connect to sandbox
Step 1: Pre-Requisites for TPP
Ensure that the following pre-requisites are met before onboarding onto Zopa:
- The TPP has registered on the Directory Sandbox - https://directory.openbanking.org.uk/s/login/
- The TPP has at least one software statement created on the Directory Sandbox environment
- The TPP has at least one transport certificate created for each of its software statements.
- The TPP has at least one redirect URI for each of its software statements.
- The TPP has a copy of the OB root and issuing certificate attached.
Step 2: Register TPP with Bank using Dynamic Client Registration
See http://openid.net/specs/openid-connect-registration-1_0-21.html
Please also contact our Open Banking support team who can help you with any issues: openbanking-support@zopa.com
We will also retain your contact details so that you can be informed in the event of any outages or changes to our API specification, as well as to contact you regarding any technical issues. We recommend using a team email address over an individual contact.
Claims required in Dynamic Client Registration are as follows (we support less strict profiles in Sandbox for ease of testing):
| Field Names | Example Values | Description |
|---|---|---|
| token_endpoint_auth_signing_alg | PS256 | Signature algorithm used |
| grant_types | authorization_code, client_credentials | |
| subject_type | public | subject_type requested for responses to this client_id |
| application_type | web | |
| iss | Software Statement Id | The issuer must be your software statement ID. This is important as it's used verify it matches the SSA software ID claim. |
| redirect_uris | All redirect Uris should be added in the claims | |
| token_endpoint_auth_method | client_secret_basic, private_key_jwt | Requested authentication method for the Token Endpoint. Note: client_secret_basic is only supported in the Sandbox for ease of testing. For production, use private_key_jwt. |
| aud | The token endpoint | |
| scopes | openid, accounts, payments | The scopes will depend on your role from the FCA (AISP and/or PISP) |
| request_object_signing_alg | none | |
| exp | timestamp | |
| iat | timestamp | |
| jti | UUID | |
| response_types | code, code id_token | Array containing a list of the OAuth 2.0 response_type values that the Client is declaring that it will restrict itself to using |
| id_token_signed_response_alg | PS256 | JWS alg algorithm |
| software_statement | Your software statement assertation |
2.1 Example Registration Request JWT (Language Agnostic)
To register, you must construct a JWT with the following header and claims, then sign it with your private key (using PS256):
JWT Header:
{
    "alg": "PS256",
    "kid": "<your-key-id>",
    "typ": "JWT"
}
JWT Claims (payload):
{
    "token_endpoint_auth_signing_alg": "PS256",
    "grant_types": ["authorization_code", "client_credentials"],
    "subject_type": "public",
    "application_type": "web",
    "iss": "<your-software-statement-id>",
    "redirect_uris": ["<your-redirect-uri>", "..."],
    "token_endpoint_auth_method": "client_secret_basic", // Only for Sandbox/testing. Use private_key_jwt for production.
    "aud": "https://auth1.openbanking-sandbox.zopa.com",
    "scope": "openid payments accounts",
    "request_object_signing_alg": "none",
    "exp": <unix-timestamp>,
    "iat": <unix-timestamp>,
    "jti": "<unique-jwt-id>",
    "response_types": ["code", "code id_token"],
    "id_token_signed_response_alg": "PS256",
    "software_statement": "<your-software-statement-assertion>"
}
Sign this JWT using your private key and the PS256 algorithm. The resulting value is your registration request.
2.2 Registering with the Endpoint (Language Agnostic)
You can POST the signed JWT to the registration endpoint using any HTTP client. For example, using curl:
curl -X POST \
    --cert <path-to-transport-cert.pem>:<path-to-transport-key.pem> \
    -H "Content-Type: application/jwt" \
    --data-binary @registration.jwt \
    "https://rs1.openbanking-sandbox.zopa.com/dynamic-client-registration/v3.2/register"
Replace @registration.jwt with the path to your signed JWT file. The response will contain your client ID and other registration details.
Python Example (for reference):
The following Python code demonstrates how to construct and sign the JWT, and submit it to the registration endpoint. You may adapt this to your preferred language or library.
import logging
import time
import uuid

import requests
from jwcrypto import jwk, jwt

logging.basicConfig(level=logging.DEBUG)

private_key_path = "./signing.key"
transport_pem_path = "./transport.pem"
transport_key_path = "./transport.key"

with open(private_key_path, "r") as key_file:
    PRIVATE_RSA_KEY = key_file.read()

# The software statement ID (software_id) of the software statement created in software statements (MIT).
SOFTWARE_STATEMENT_ID = "..."

#  KID of the private key associated with your signing certificate
KID = "..."

# Software Statement Assertation (jwt)
SOFTWARE_STATEMENT_ASSERTATION = "..."

REDIRECT_URIs = ["..."]

def make_registration_jwt(
    software_statement_id: str, kid: str, software_statement: str
) -> str:
    jwt_iat = int(time.time())
    jwt_exp = jwt_iat + 3600
    header = dict(alg="PS256", kid=kid, typ="JWT")
    claims = dict(
        token_endpoint_auth_signing_alg="PS256",
        grant_types=["authorization_code", "client_credentials"],
        subject_type="public",
        application_type="web",
        iss=software_statement_id,
        redirect_uris=REDIRECT_URIs,
    token_endpoint_auth_method="client_secret_basic", # Only supported in Sandbox/testing. Use private_key_jwt for production.
        aud="https://auth1.openbanking-sandbox.zopa.com",
        scope="openid payments accounts",  # accounts for AISP or payments for PISP or both
        request_object_signing_alg="none",
        exp=jwt_exp,
        iat=jwt_iat,
        jti=str(uuid.uuid4()),
        response_types=["code", "code id_token"],
        id_token_signed_response_alg="PS256",
        software_statement=software_statement,
    )

    token = jwt.JWT(header=header, claims=claims)

    # Needed only if you set your private key is encrypted
    encoded_password = "secret".encode("latin-1")

    key_obj = jwk.JWK.from_pem(
        PRIVATE_RSA_KEY.encode("latin-1"), password=encoded_password
    )
    token.make_signed_token(key_obj)
    signed_token = token.serialize()

    return signed_token

registration_request = make_registration_jwt(SOFTWARE_STATEMENT_ID, KID, SOFTWARE_STATEMENT_ASSERTATION)

headers = {'Content-Type': 'application/jwt'}
client = (transport_pem_path, transport_key_path)

response = requests.post(
    "https://rs1.openbanking-sandbox.zopa.com/dynamic-client-registration/v3.2/register",
    data=registration_request,
    headers=headers,
    verify=False,
    cert=client,
)

print(response.content)
The response you get from this registration is exactly the same as the one described by the OIDC dynamic registration. You should now have successfully onboarded your TPP with the ASPSP and received a client ID; you will need this client ID for future interactions with the ASPSP.
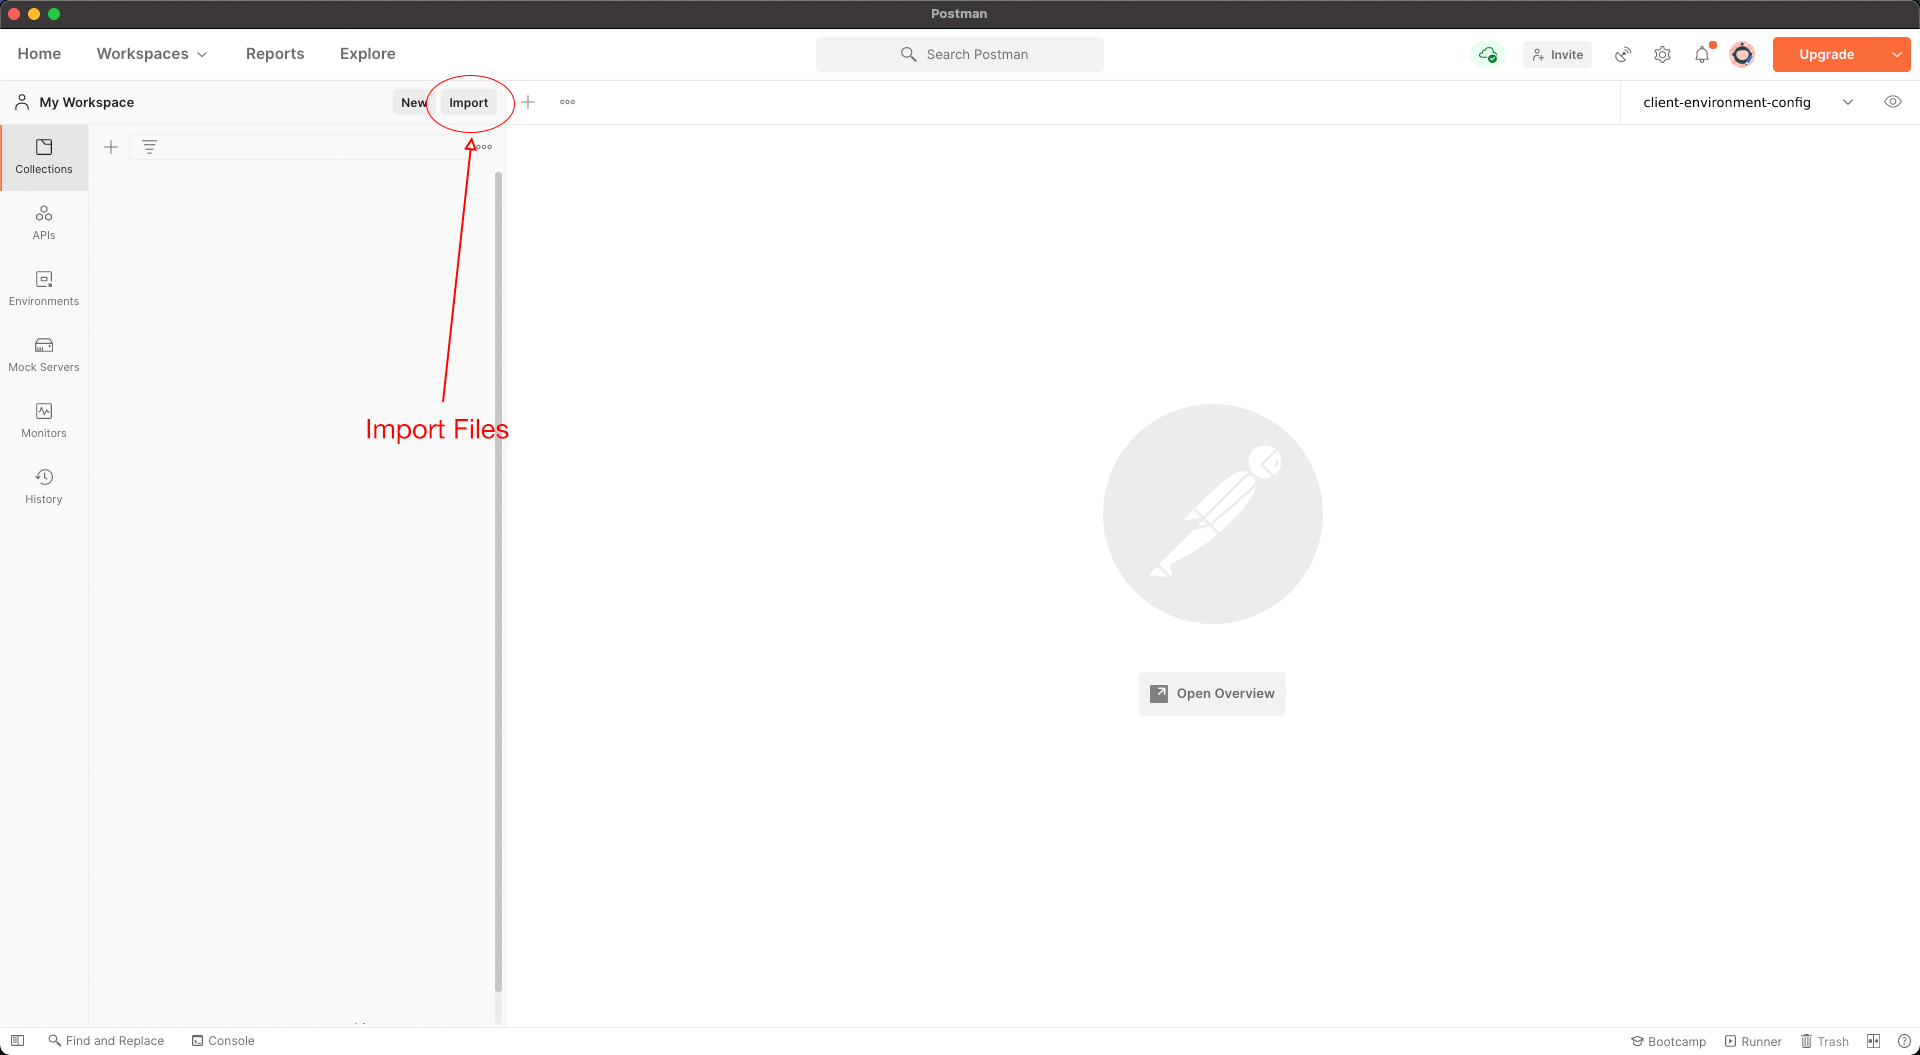
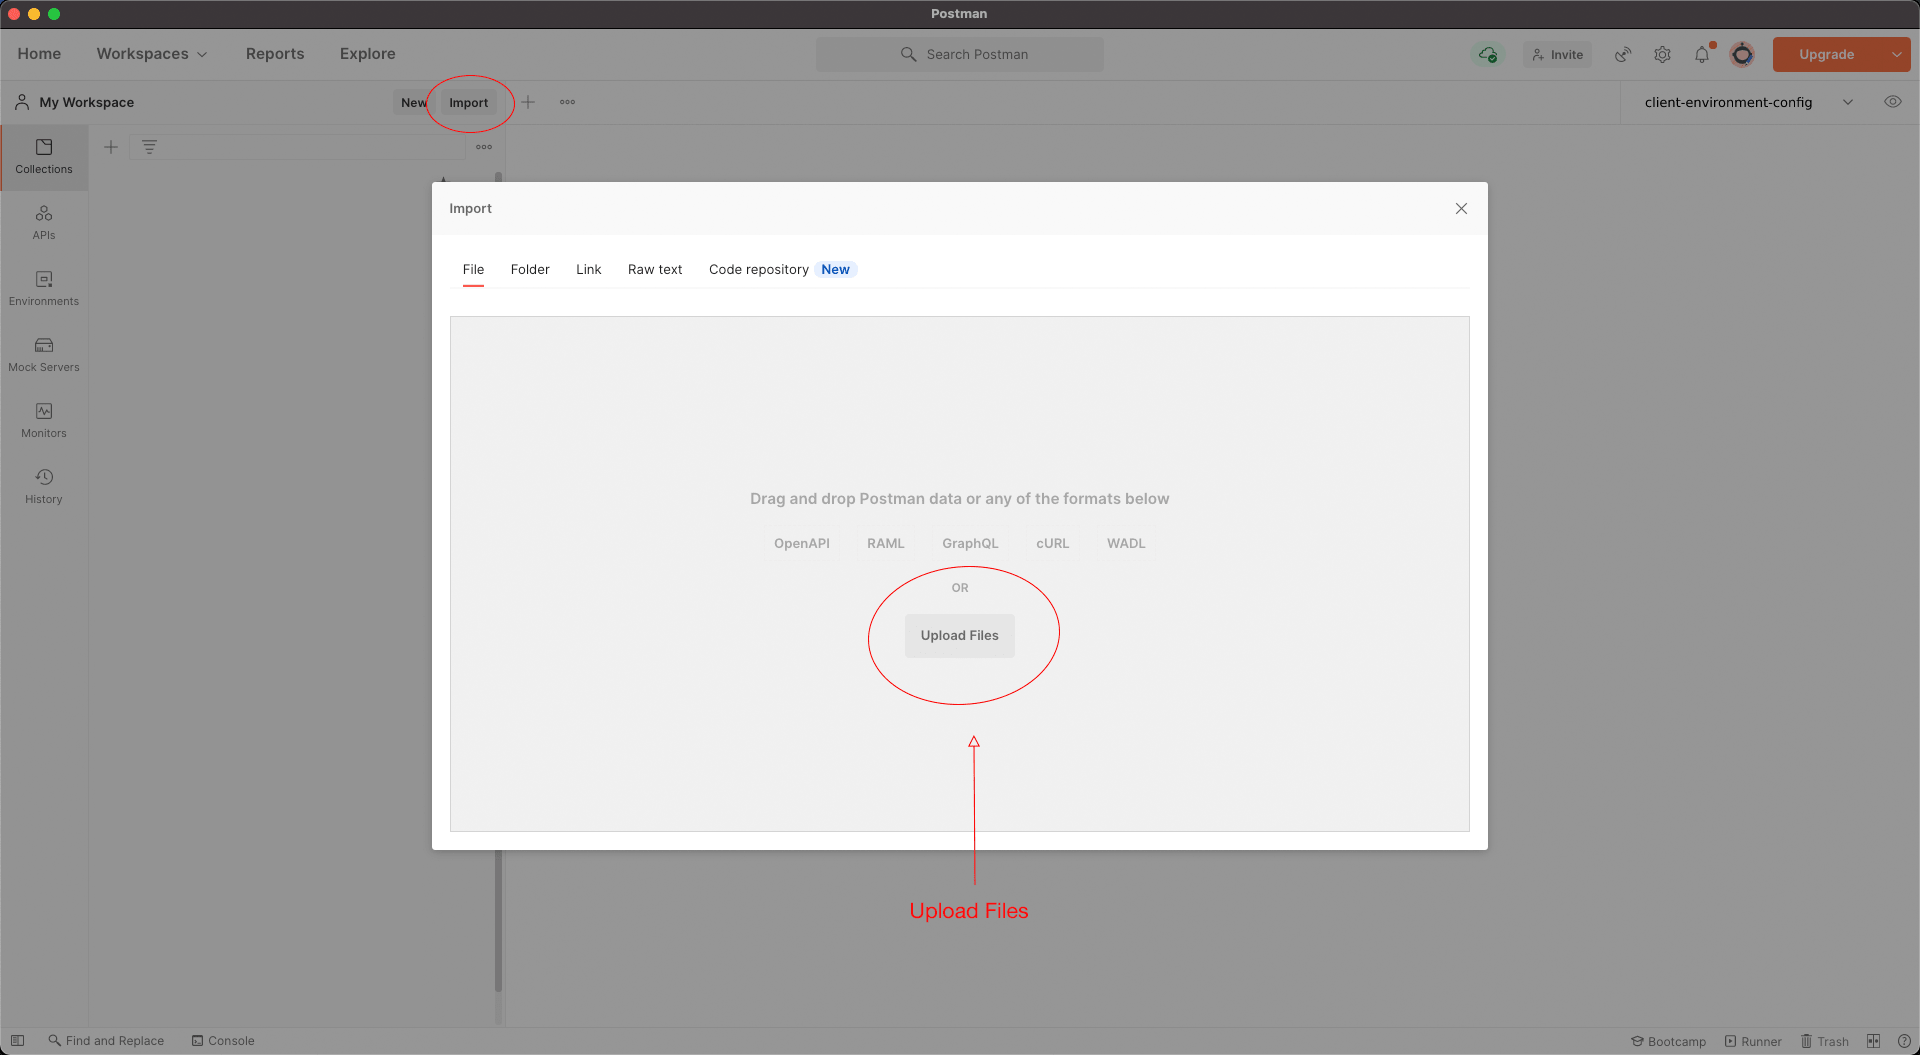
Step 3: Import Environment Files and Collections To Postman
3.1) Import Environment Files and Collections into Postman
You can find the Postman collection under resources.
To obtain an environment file, call the following endpoint (replace {client_id} with your actual client ID):
https://rs1.openbanking-sandbox.zopa.com/o3/v1.0/postman/environment?client_id={your-client-id}
Download the environment file and import it into Postman along with the collection.
Please note that the sandbox supports less strict security profiles than production.
3.2) Check URLs are loaded successfully
3.3) Add Client Certificates Add the following ASPSP end points into Postman;
The CRT should be set to the transport certificate downloaded from the open banking directory. The Key value should be set to the private key for the transport certificate.
3.4) SSL Certificate Verification (TPP) In Postman settings ensure SSL Certificate Verification is set to off.
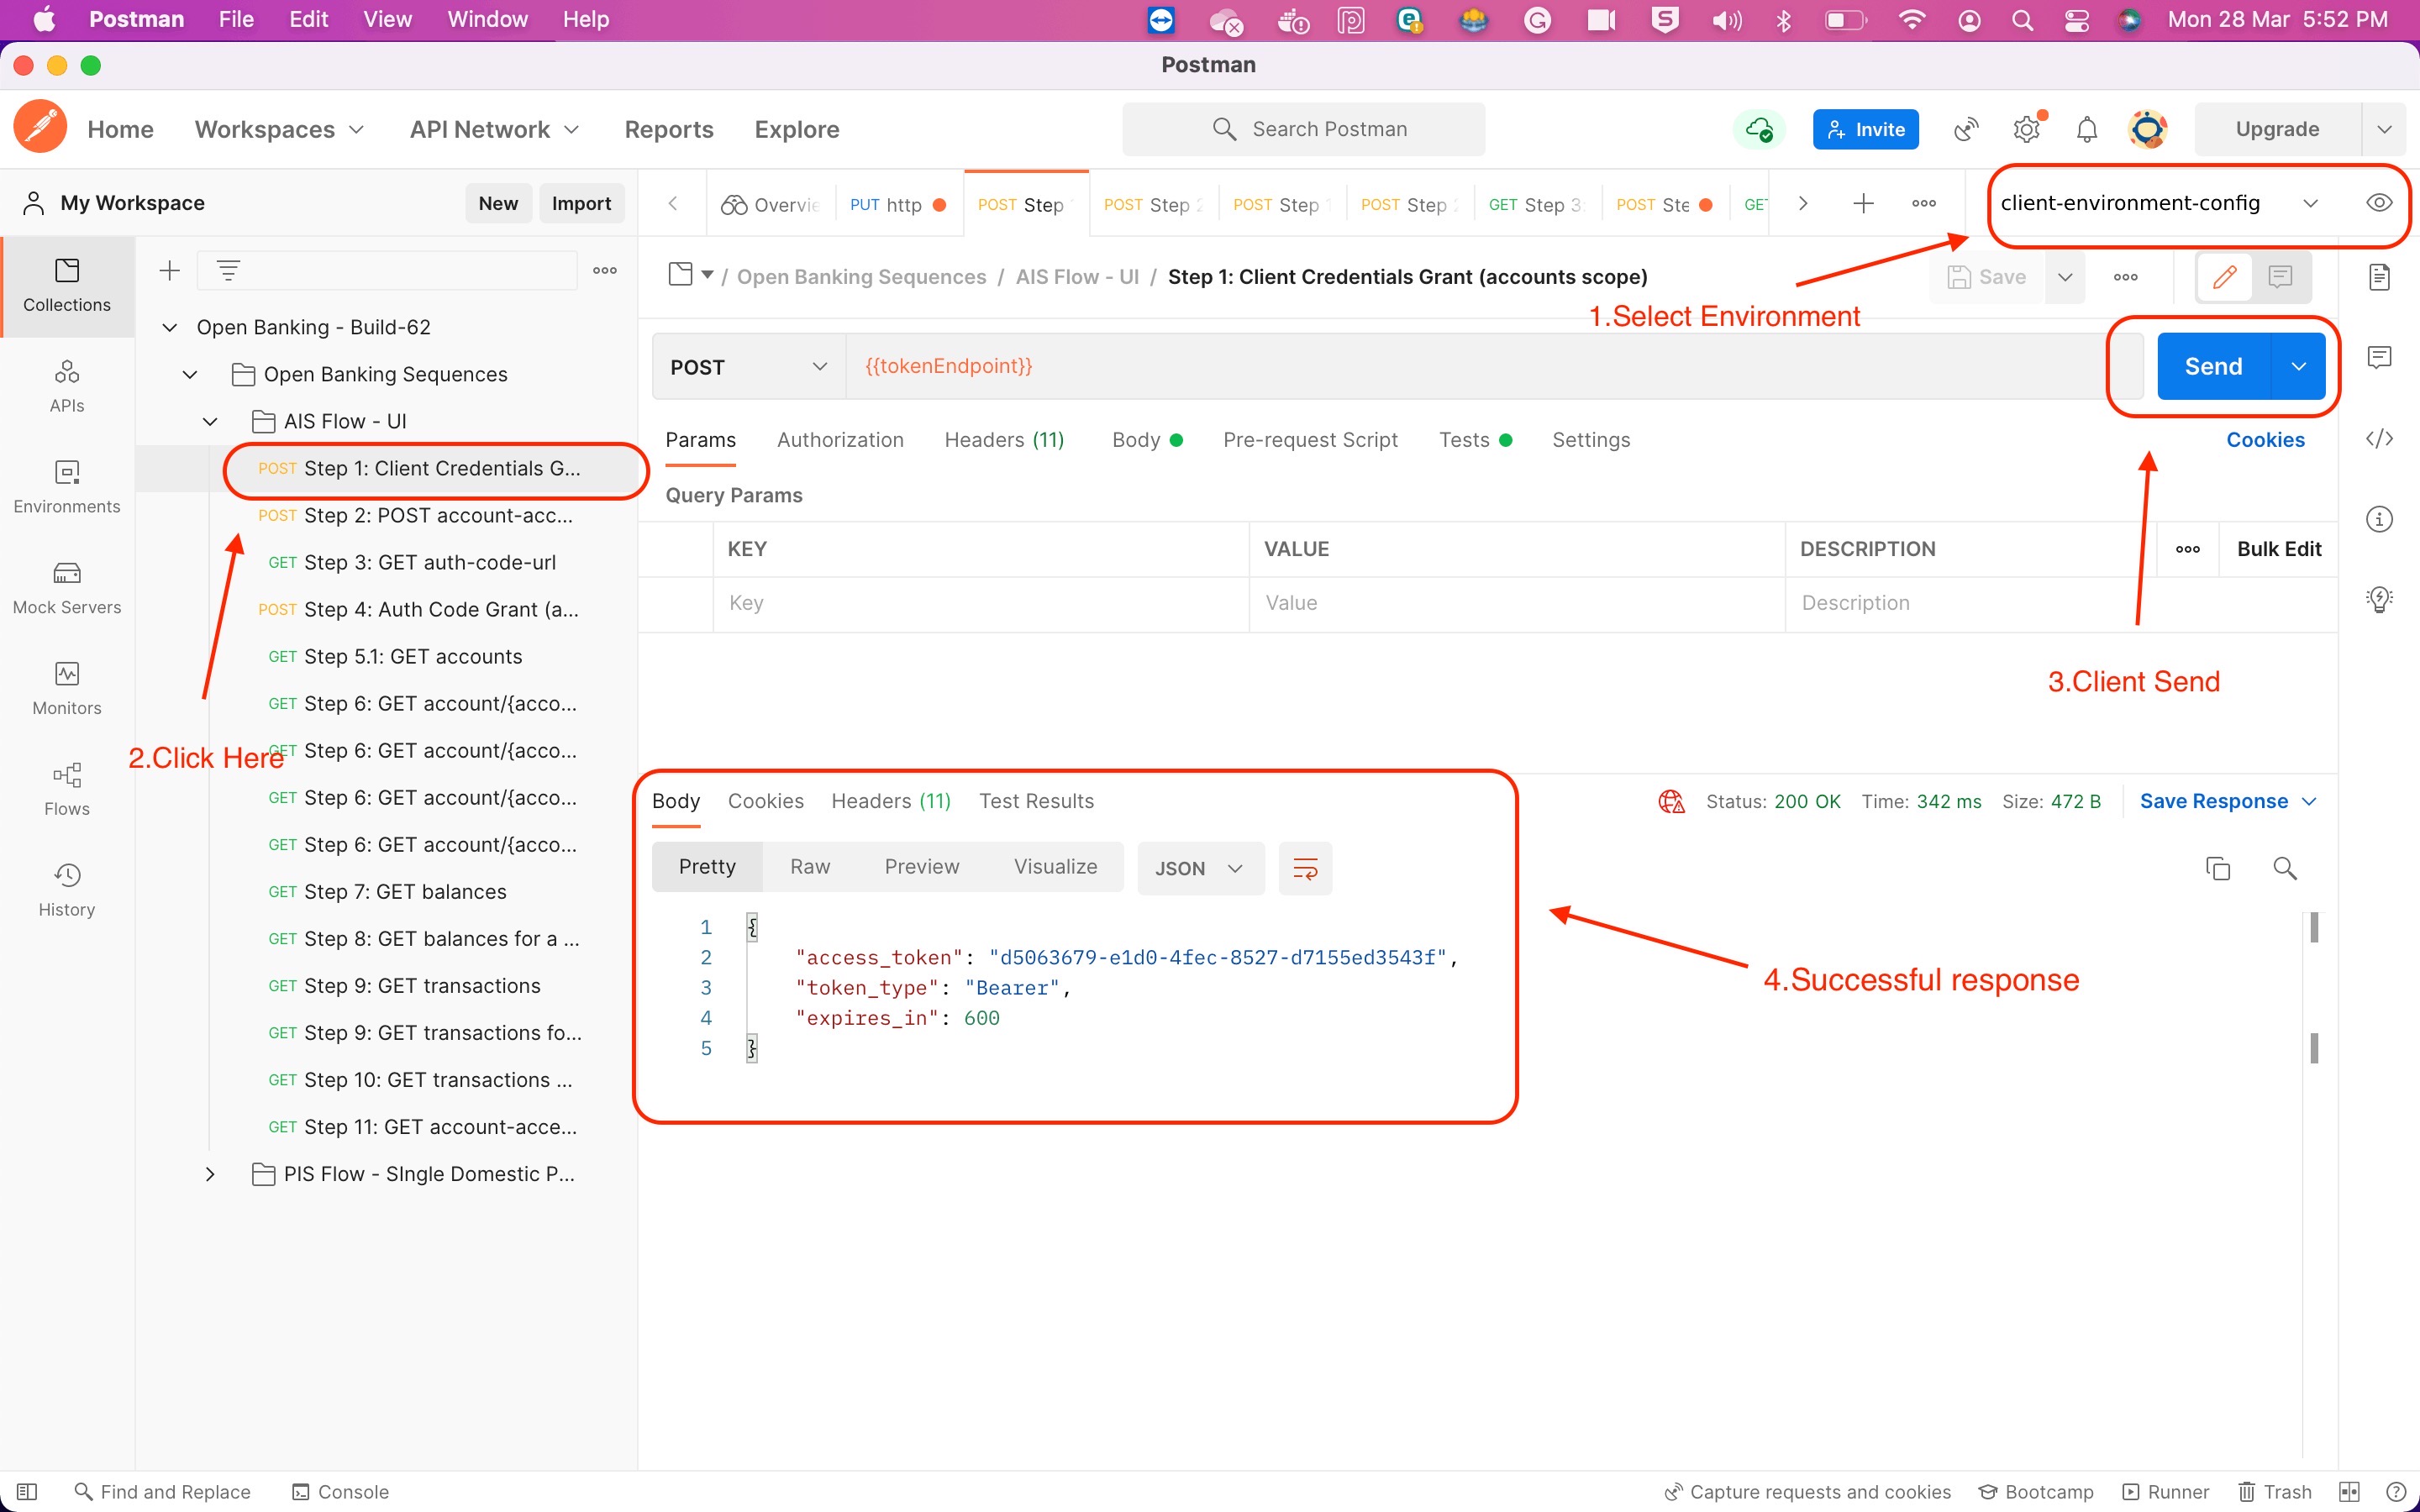
Step 4: Account Information Flow
4.1) Client Credentials Grant
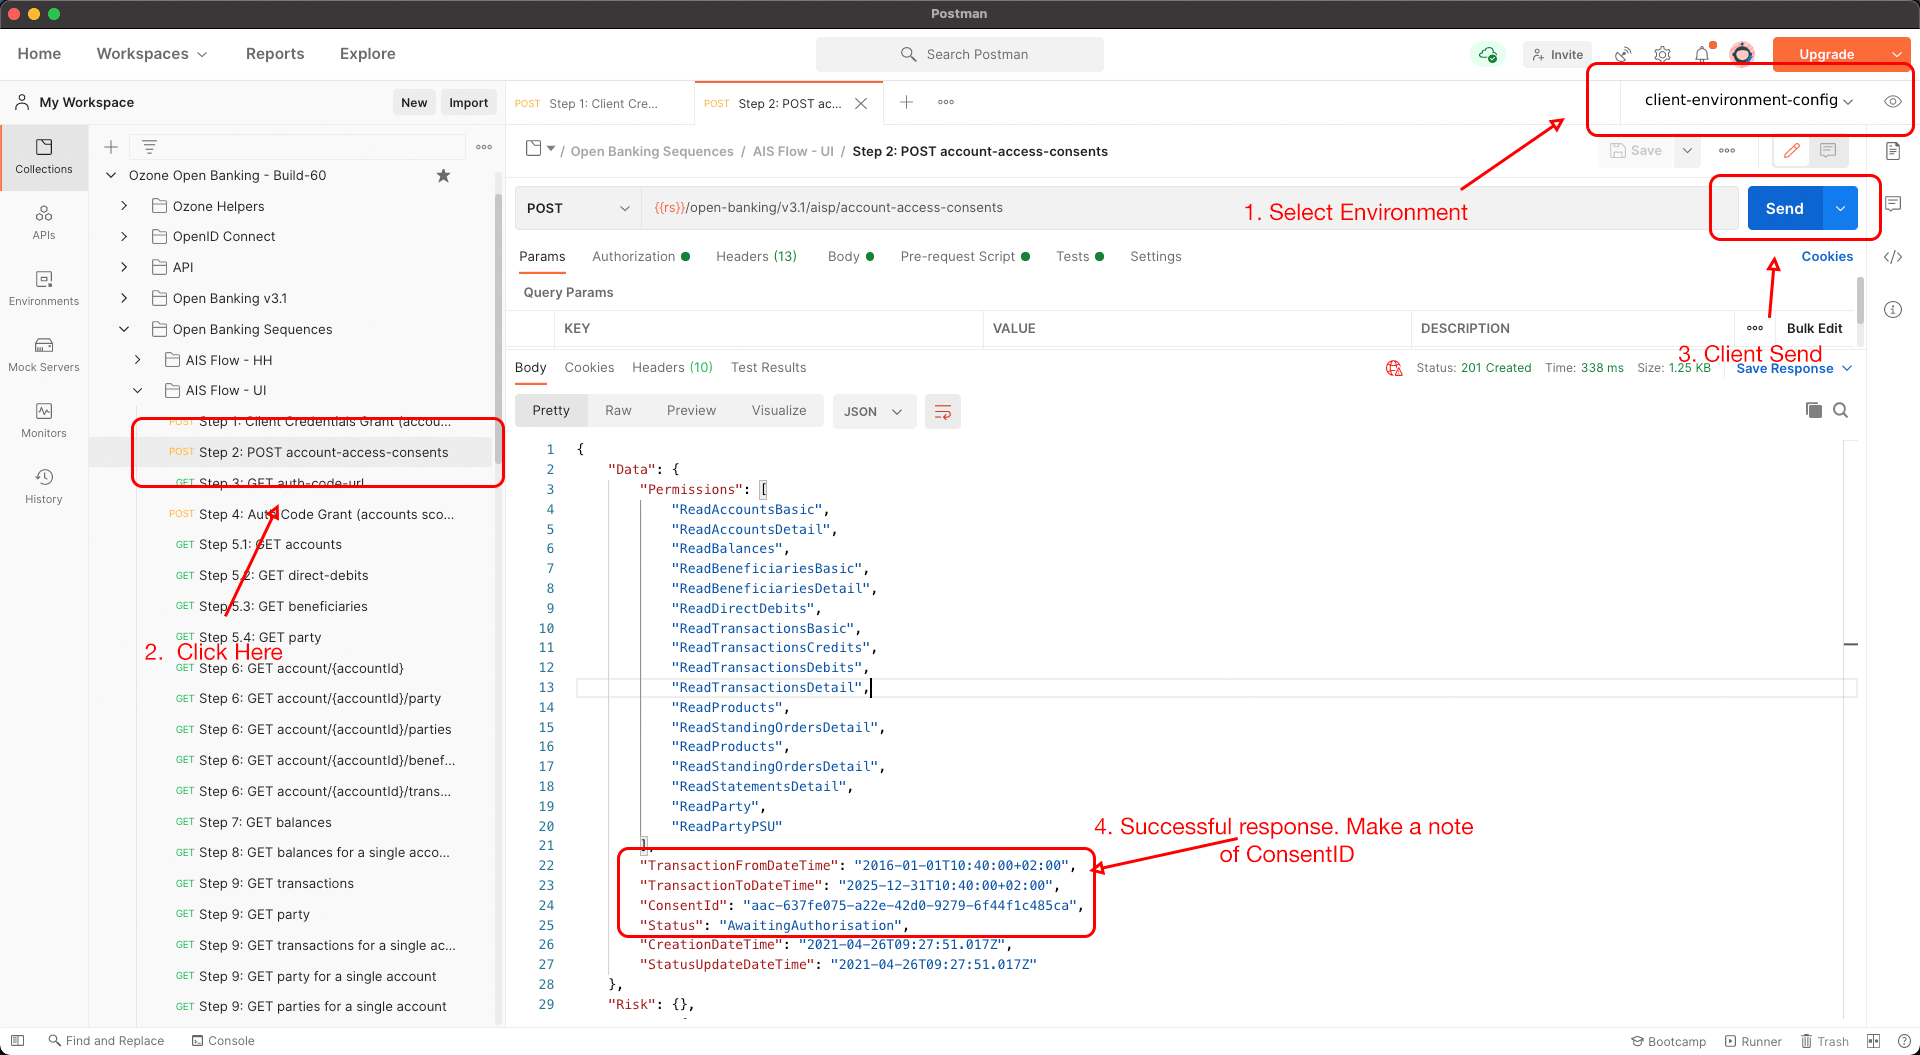
4.2) Account Access Consent
4.3) PSU Consent Flow TPPs can generate the consent flow URL by postman
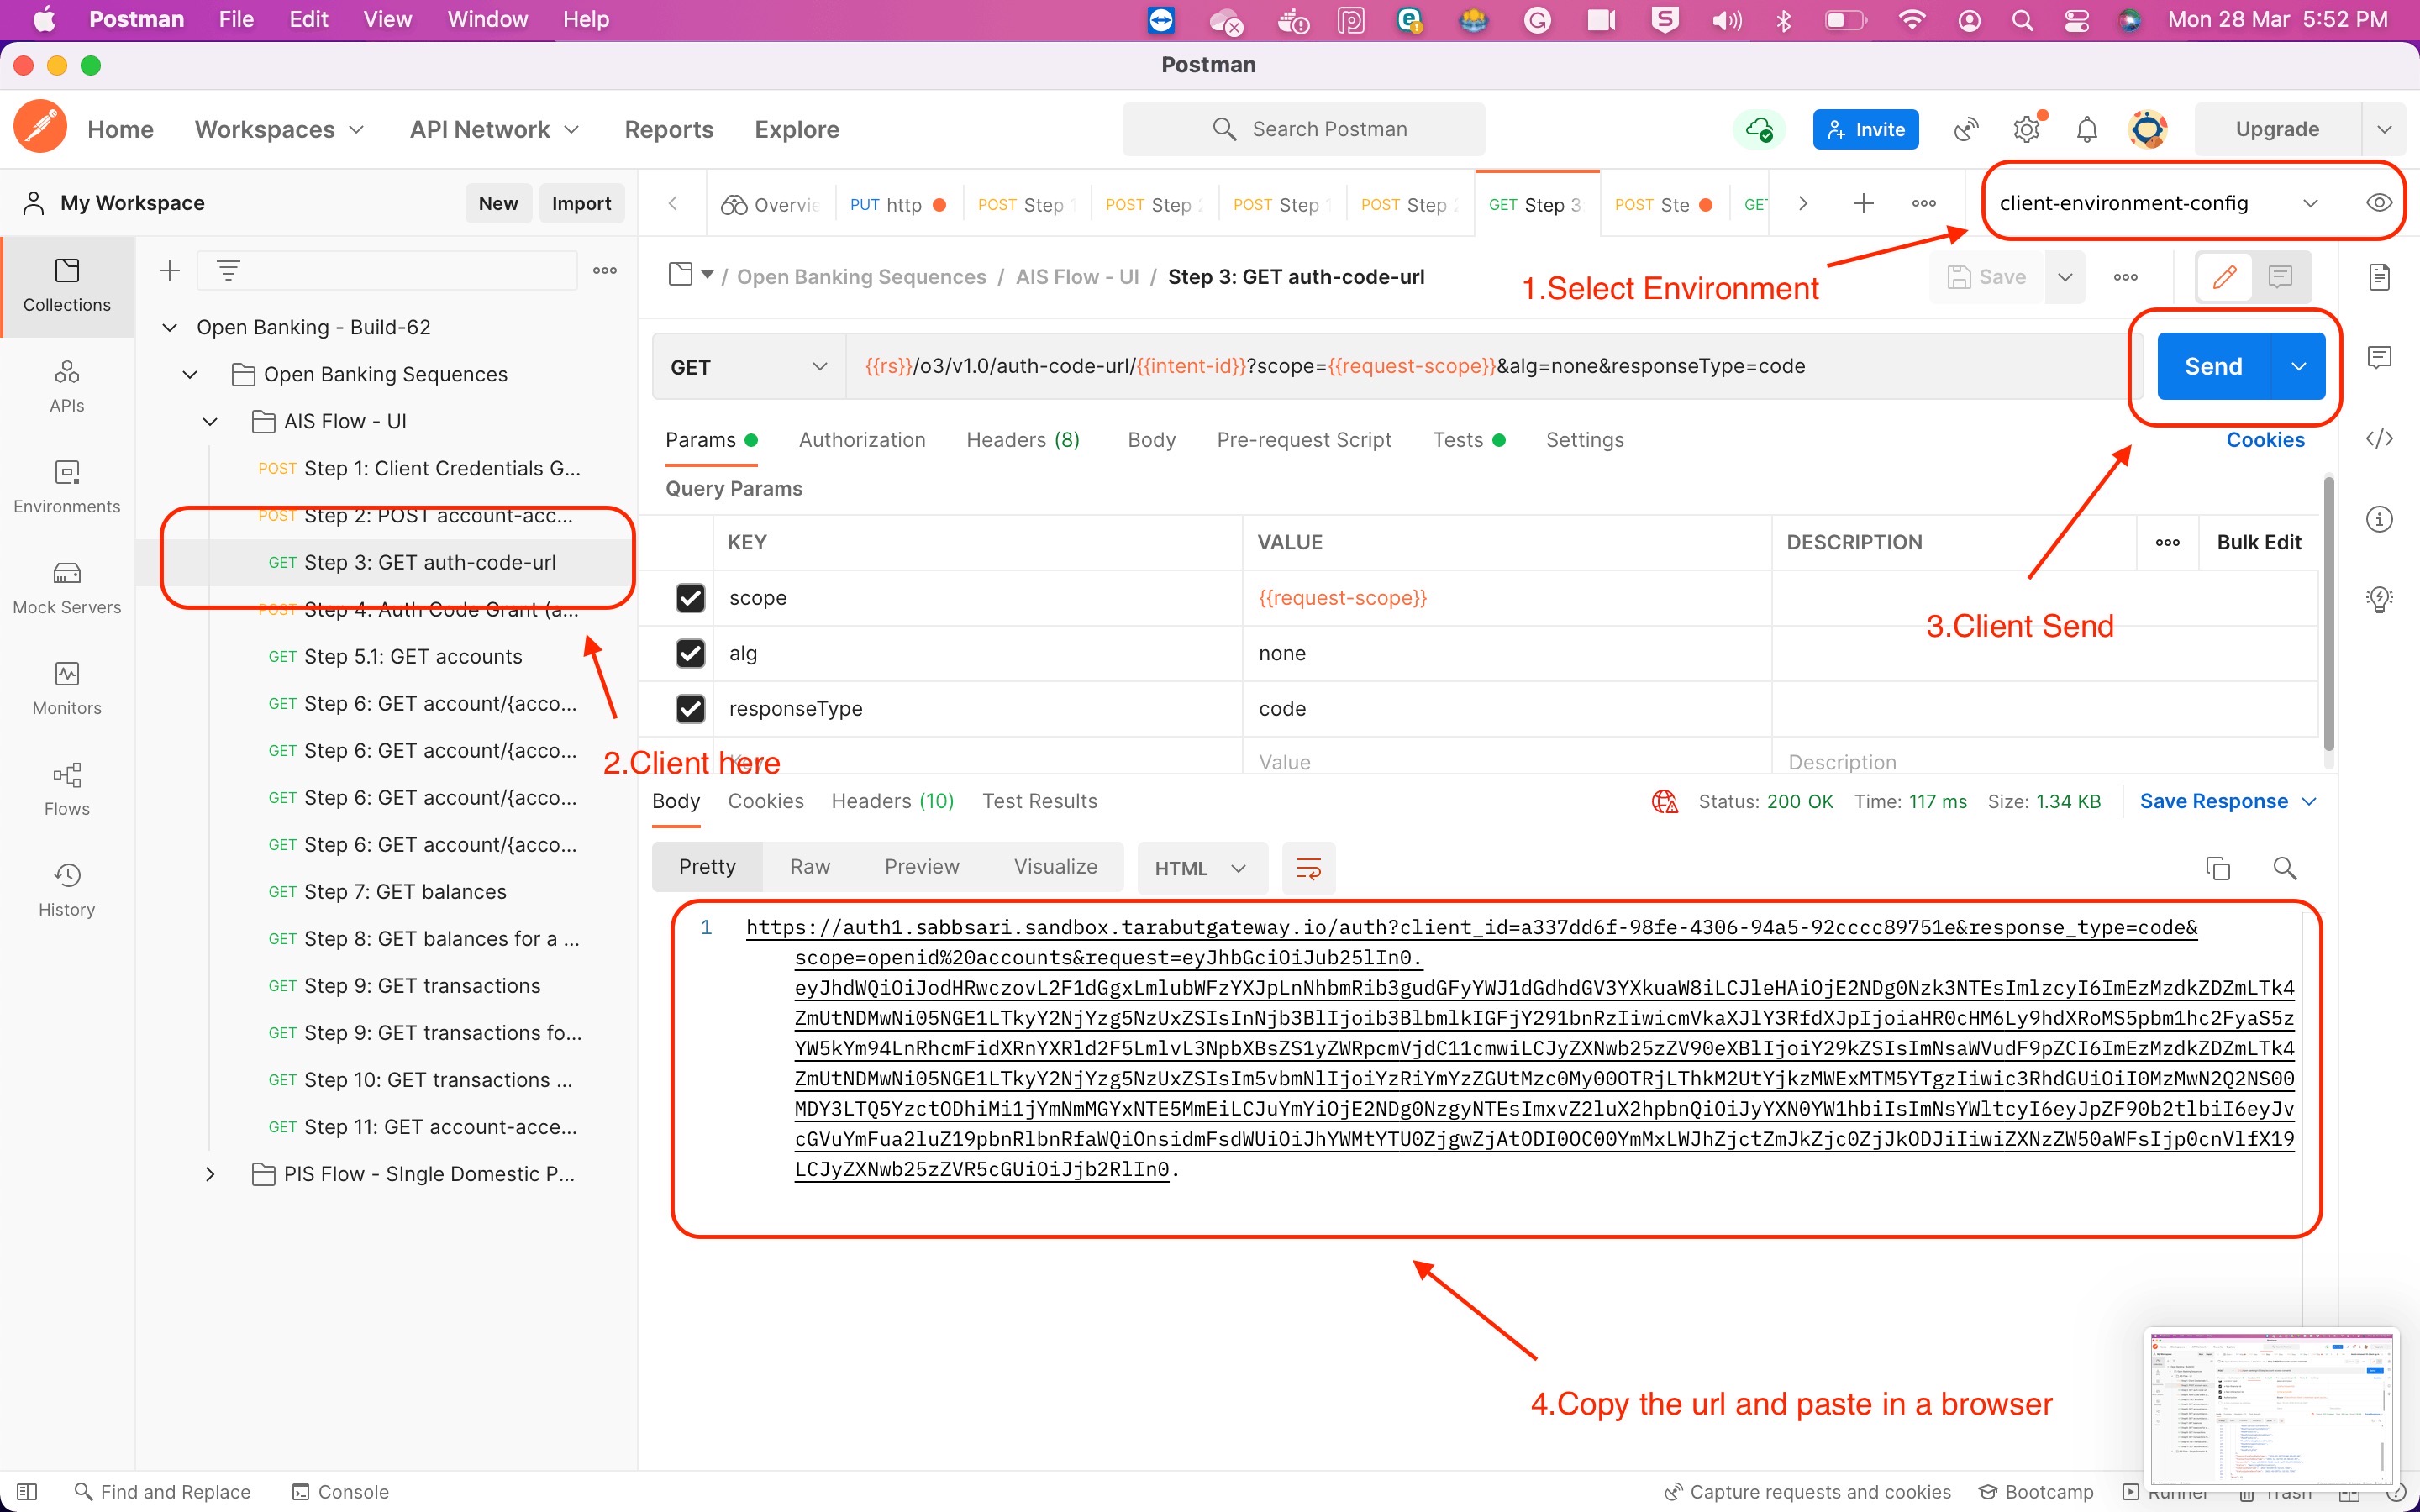
Once the URL is constructed, open the URL to initiate the PSU consent flow
Authenticate user
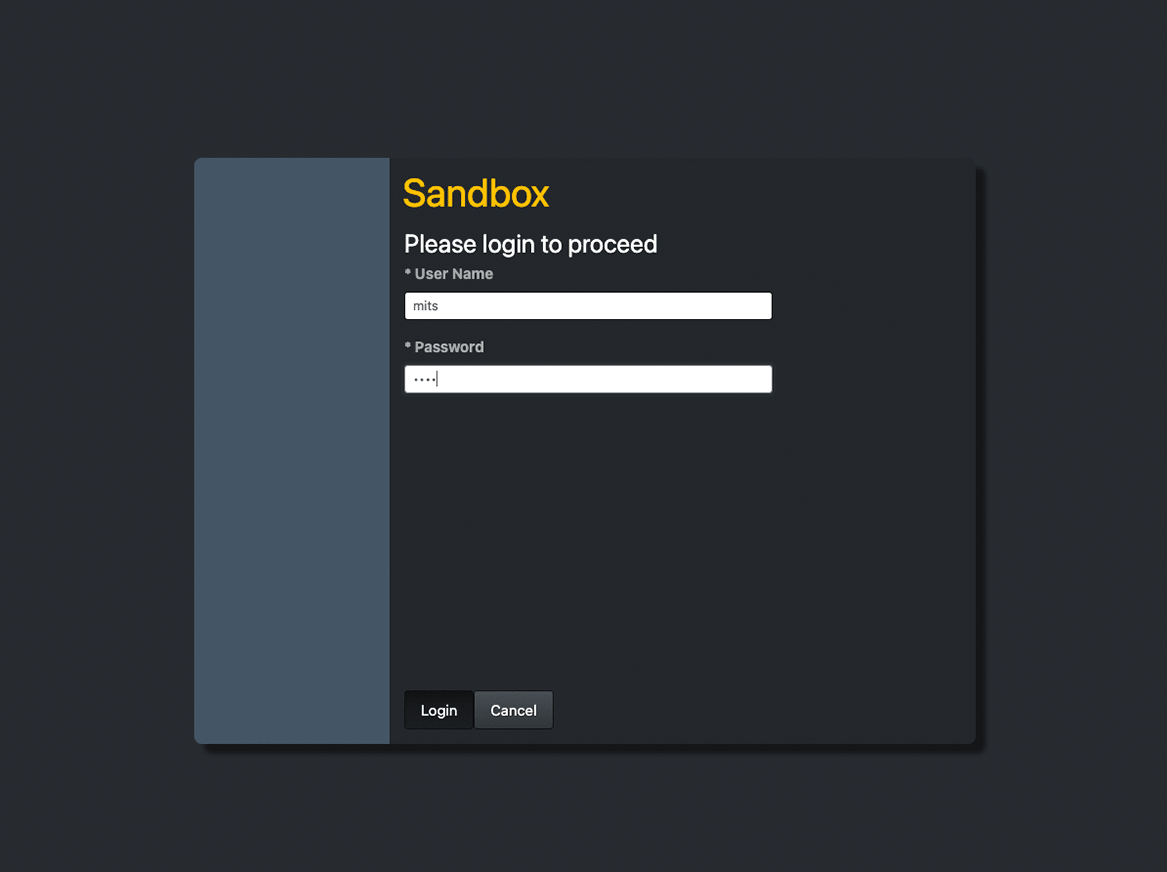
Sandbox User Accounts
| user | password |
|---|---|
| rora | rora |
| mits | mits |
| ivsa | ivsa |
Select accounts
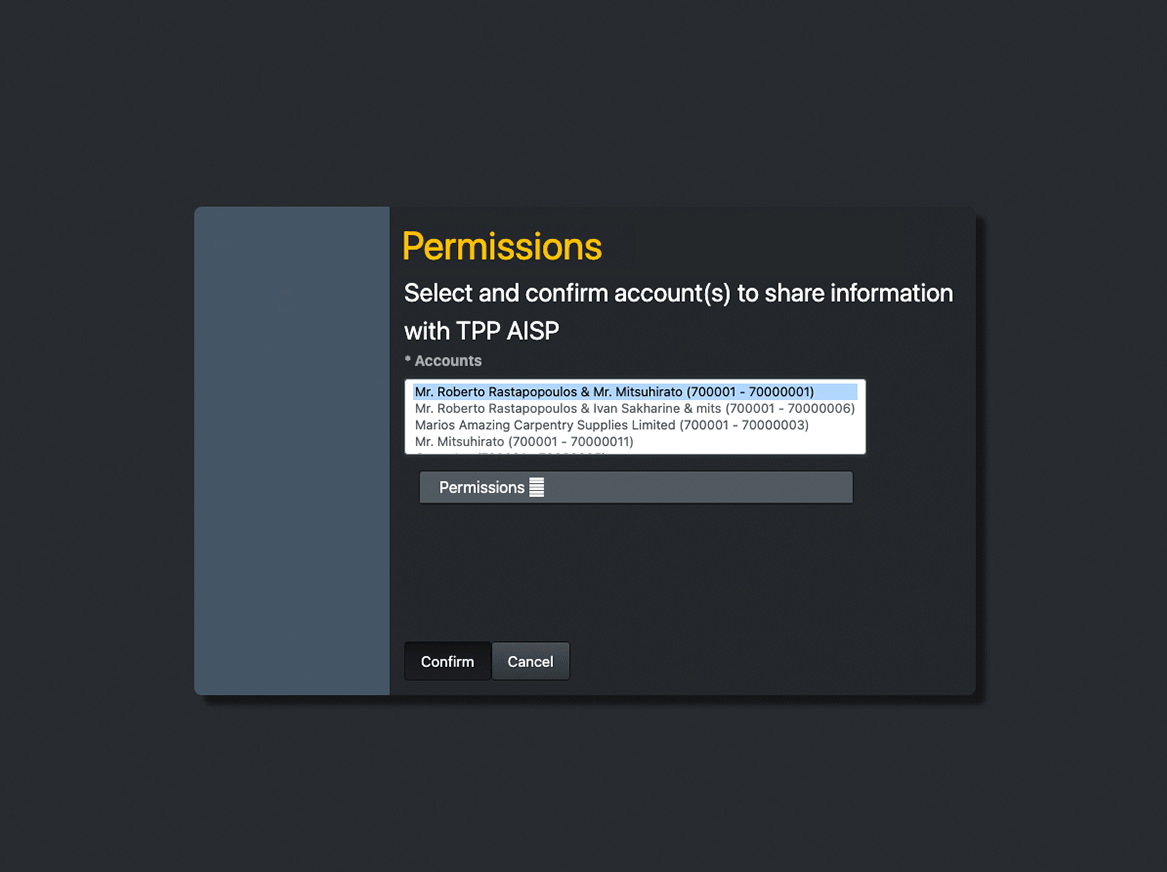
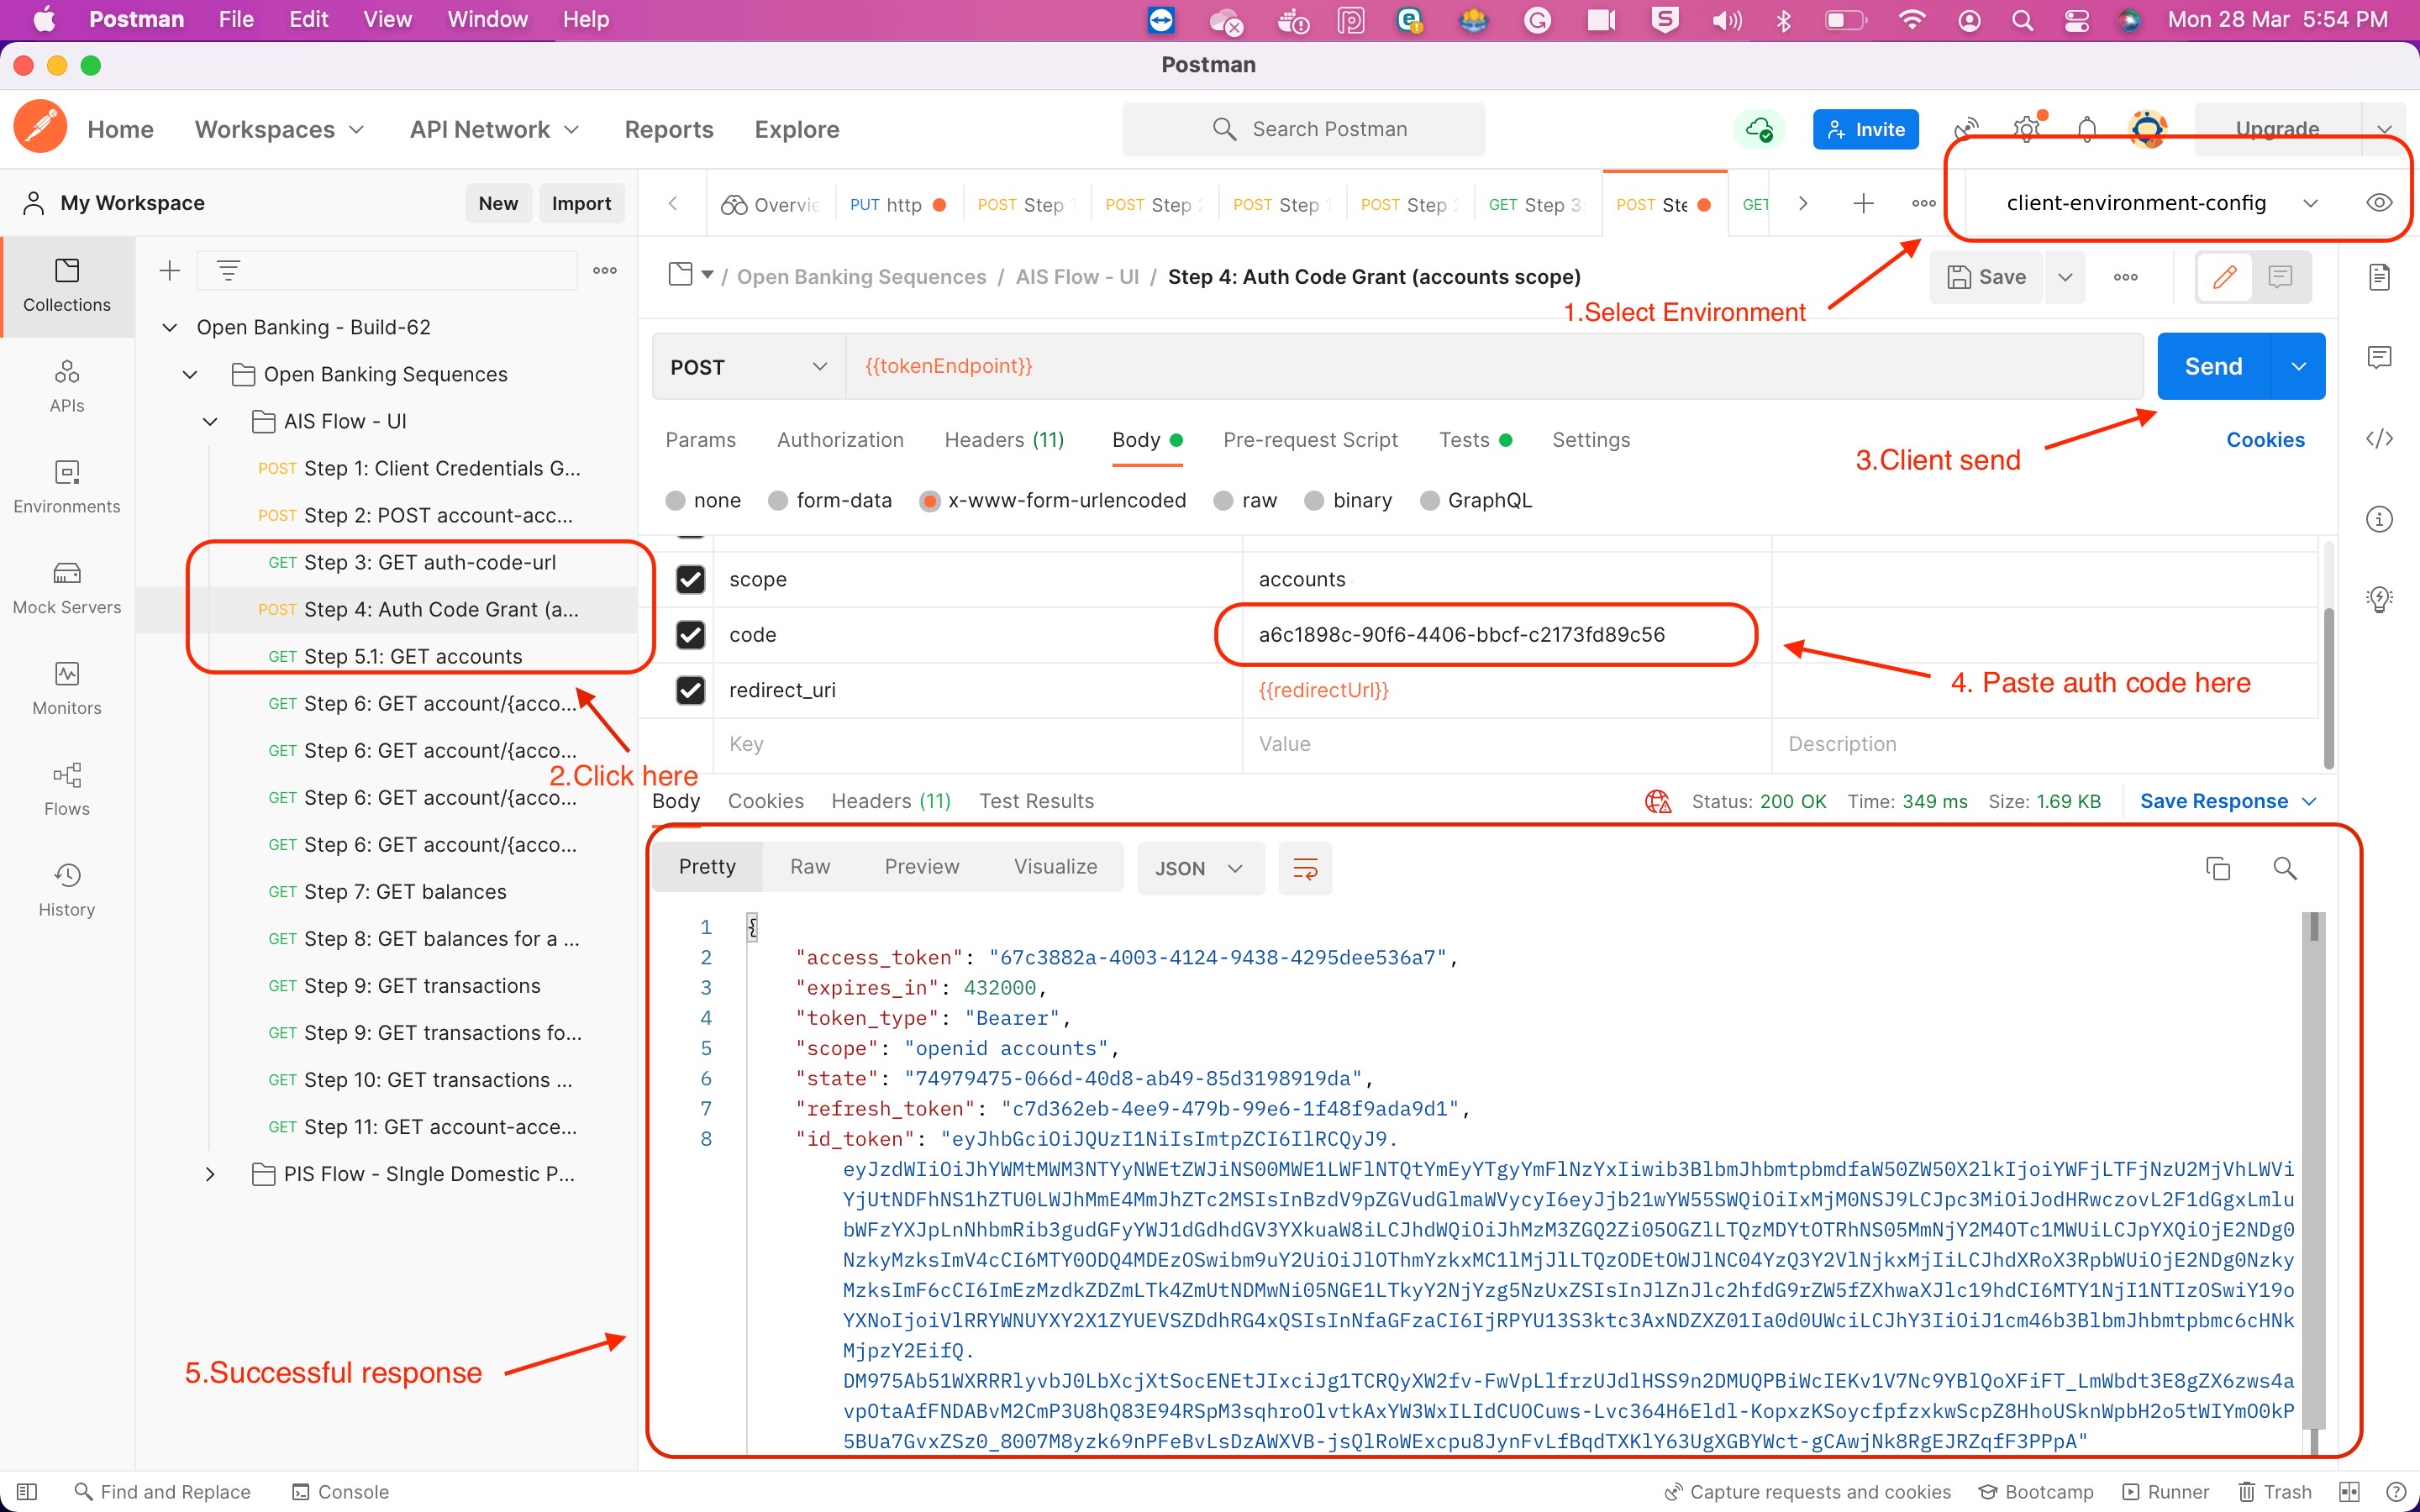
Once the PSU consent is successful, Zopa will redirect back to the redirect URI. Copy the Authcode from the URL

4.4) Generate the access token
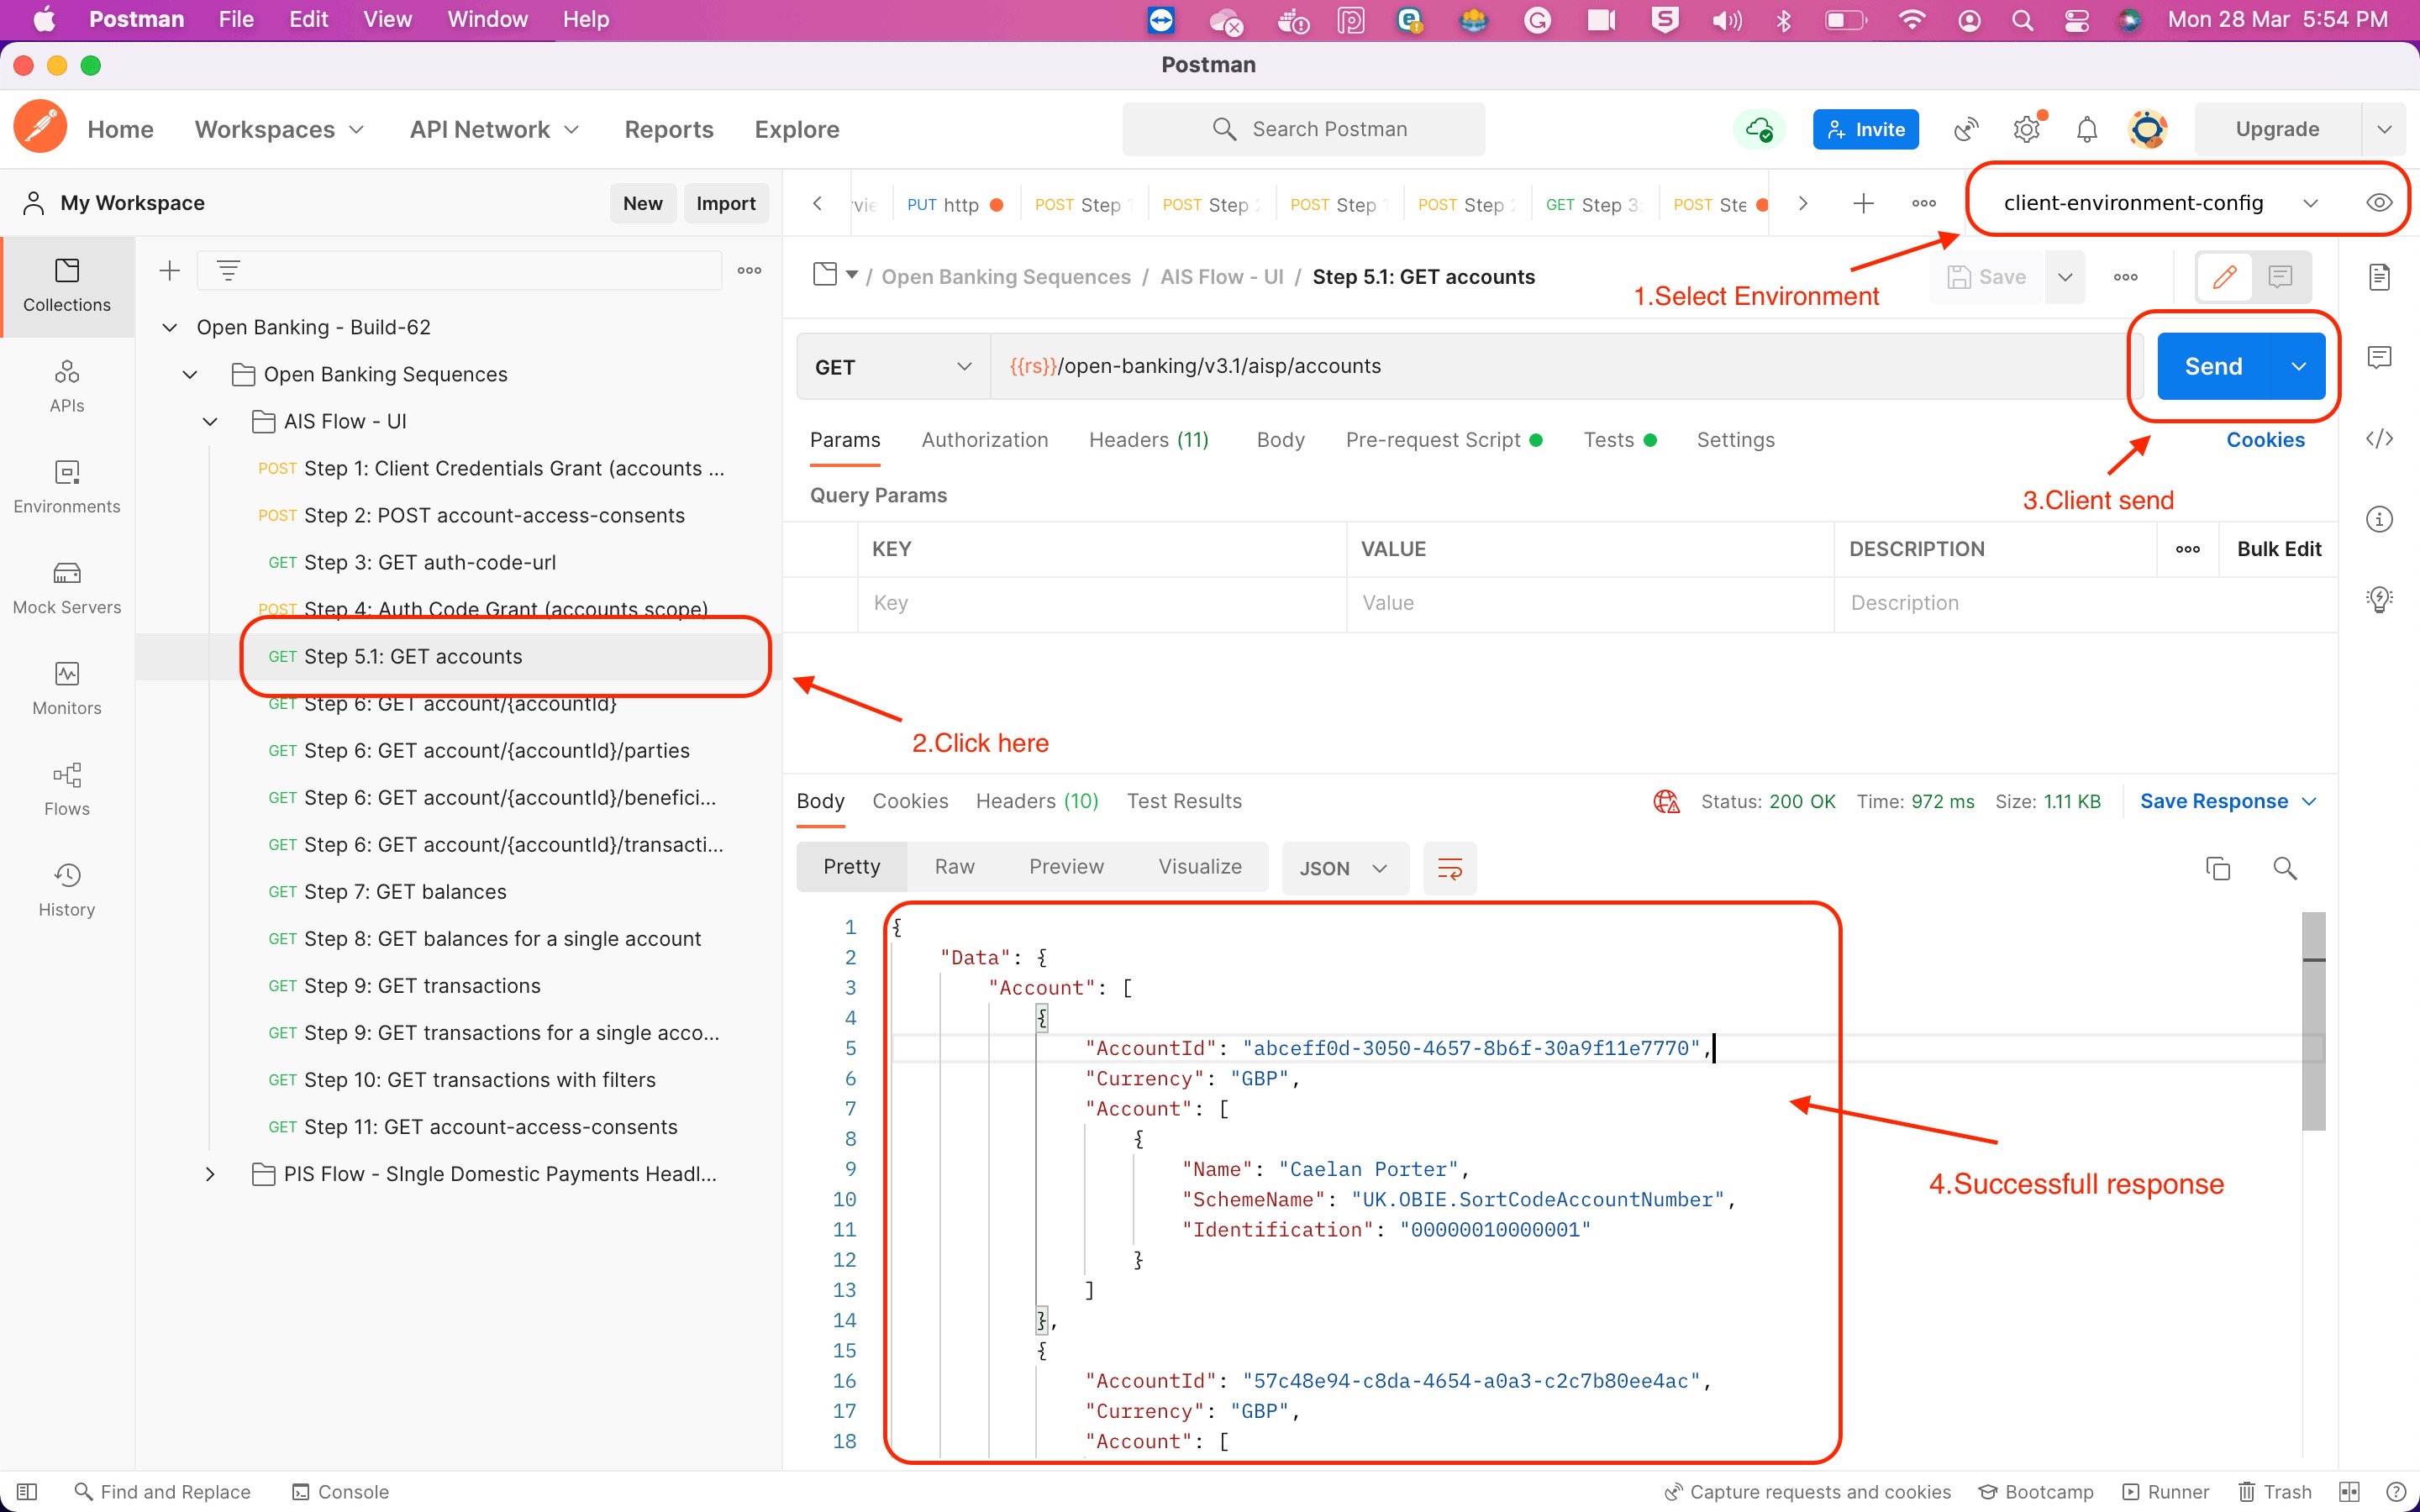
Step 5: Retrieve Account and Transaction Data
Retrieve Account Data
![]()